Up next in 10


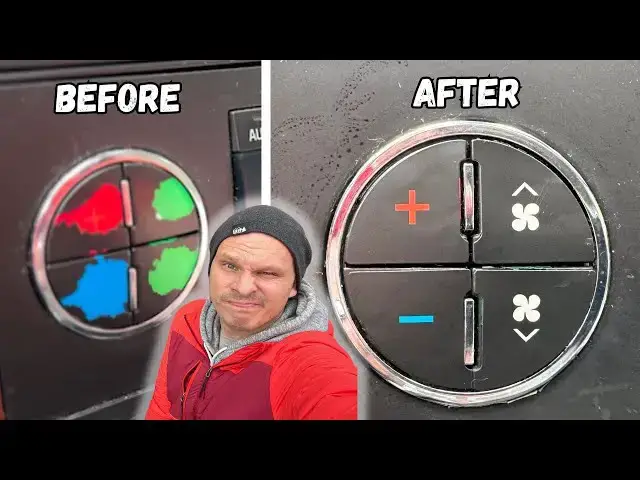
The dash buttons on my 2007 Chevy Tahoe have been driving me nuts, and have even led me to misunderstand what each button even does. Before I went out and spent far too much time and money on replacing the buttons itself, I wanted to try out these cheap stickers that cover up the buttons to see if they are worth it.
- Buy This Sticker Pack from Amazon (Paid Link): https://amzn.to/499RqVX
- Read the Article Review: https://readysetrev.com/ac-dash-button-repair-kit-review-theres-only-1-issue
Show More Show Less View Video Transcript
0:00
Oh, what did you look at that? It took the back of it off. That's interesting
0:04
Huh, that one may not end up working. So this is my 2007 Chevy Tahoe. And if you're somebody that
0:10
owns an SUV from Chevy in this generation, you probably know exactly the issue I'm about to talk about
0:17
So I'm going to turn you around and show you. So pretty much every Chevy Tahoe I have seen has this issue with these buttons right here
0:24
As you can see, they are all worn out. You can't even see the symbols. Right here is actually the
0:29
off button for the HVAC controls and I'll be completely honest I did not even know
0:35
what that button was until I accidentally pushed it one day I actually thought
0:40
this didn't have a way to turn off the HVAC so it is a considerable issue and I'm
0:45
hoping to resolve that today instead of going the expensive route of replacing the
0:50
buttons themselves I actually got a sticker pack off of Amazon I think these
0:55
were like five or six bucks and I'm gonna be testing them out today so I'm gonna be
0:58
installing them on my buttons and then I'm going to review them and let you guys know if it is worth it
1:03
or maybe if you should go ahead and replace the buttons. So to fix these buttons, you need a couple
1:09
different things. First off, you obviously need the sticker pack. You need an exacto knife or a razor blade
1:14
to be able to kind of clean up the area as well as to apply the stickers themselves. And then you also
1:19
need a Sharpie. And I'll get into why that is in just a minute. So by the end of this video
1:24
you're going to know the pros, the cons. And if this is something you guys should buy
1:28
so let's go ahead and get right into it. All right, so the reason behind having the Sharpie is because you can see right here
1:36
these stickers basically don't go all the way to the edges. And as you can see, like right here, this red is going all the way to the edge
1:44
So what I'm going to do is I'm going to go in about an eighth of an inch and draw it in with a Sharpie
1:48
It may look a little bit odd during the night, but I'm willing to sacrifice that. So I'm going to go ahead and draw in around the edges there to be able to make it so that it just, you know
1:58
looks a little bit nicer and you don't see the edges right there. So let's go ahead and do that
2:03
As you can see, I am taking the Sharpie. And I feel a little bit ridiculous doing this, but it makes sense
2:12
So the instructions said it was about an eighth of an inch. You don't want to go any further than that because you want to make sure that you're not covering up where the holes are
2:22
So I might do a couple different layers on this because it seems like the Sharpie is not covering
2:28
completely so we might let that dry and then I'm gonna do a little bit right there
2:33
little bit right there I gonna leave that one alone I think and so that looks about right so I gonna come back in in a couple minutes once these have dried and I going to fill them in All right we are back So I going to go ahead and fill these in a little bit more like that
2:50
I'm actually going to do a little bit right there too. Of course, my Sharpies drying out ever so slightly here
2:56
I'm going to fill this in. We're going to do another layer there
3:01
This may not end up being perfect, but I think it'll do a pretty good job
3:07
All right, we're gonna let that sit for a minute. Okay, and I'm gonna do a final one just to kind of, you know, fill in a little bit more
3:15
I'm not gonna worry about it, I think, past this, because I think it'll fill it in pretty well
3:19
But we might as well do it one last time. Okay, so next step is to go ahead and open up the packaging, of which, by the way, if you do want to buy one of these for yourself
3:29
I'm gonna leave a link down in the description and the top comment, as I'm really hoping and quite hopeful that this is going to work
3:35
So let's go ahead and open this up. We're going to take that. I have already read through the directions, which is obviously why I know how to do this
3:43
This is an adhesion promoter, but we're going to go ahead and look at the packaging first
3:47
So as you can see, these are my buttons for this right here
3:51
These are my buttons for right here. But as you can see, like, so the passenger side here is not too bad
3:56
So I'm actually not going to even mess with those and replace those. I'm only going to mess with the ones that I have issues with
4:01
As you can see right here, I'm going to replace that one, that one, that one, that one
4:06
and then obviously all of those. So there are packs out there that can even get you new buttons for these and that kind of stuff
4:12
but I didn't need those packs. So I opted for this one, which only comes with a limited amount, but it's only ones that I need
4:18
So before I put these on, let's go ahead and grab the adhesion promoter
4:23
Interestingly enough, this adhesion promoter is not even mentioned in the directions
4:27
but that's okay. It makes sense to me. So we're going to open this up and go like this
4:36
we're going to put that right there like that and we're going to put it all over
4:45
I think there's just an alcohol pad honestly. And I just cleaned off all of the permanent marker that I just put on
4:51
So we're going to go ahead and go through that process again and we'll be right back. All right
4:55
And we are back. So what I'm going to do now is I'm going to grab this kit right here
5:01
We're going to start with these buttons. As you can see, I have drawn those all in
5:05
So what we're going to do is I'm going to grab this Xacto knife right here
5:10
I mean it's technically not an Xacto knife, but that's what they called for and I don't have an exacto knife
5:14
So we going to go ahead and start So what we going to do is these are quite literally just stickers I think you can buy these for quite a few other vehicles out there but this is for my Tahoe but as you can see it literally just a sticker So we going to line it up I guess the best way to do this is with an exacto knife like this
5:33
So you want to make sure that you line it up perfectly. I think I'm going to line it up with this little thing right here
5:45
Let's see. Hey, that actually looks really good. All right, so that is the first one
5:54
I think it's on there perfectly. Okay, so let's go ahead and do the next one
5:59
So I don't want to really touch it with my fingers because you don't want to put any oils on there
6:04
So we're using the exacto knife again. So that's that. And then I want to line it up again
6:12
Ooh, that actually turned out really well. And we're going to put it down like that
6:22
And then let's go to this one now. Okay, this is actually working way better than I was expecting it to
6:35
I figured this would take me a couple tries each time. All right
6:41
I think that one's... Oh, yeah, that one seems all right. stick into my knife
6:47
All right. There's that one. That one doesn't seem quite as perfect
6:53
So we might take that one off and move it upwards a little bit
6:58
Oh, what did you look at that? It took the back of it off. That's interesting. That one may not end up working
7:07
but we'll see. All right. And then The last one for this side of the controls
7:20
So this is how we're going to lower the fan speed. That did not work
7:28
Hopefully that did not take. Yep, it did. Okay. So so far, the issue I am seeing is if you need to reposition them, they are taking off the paint behind it, which is really interesting
7:43
So as you can see, this one is already kind of peeling off right there. Not a huge fan of that
7:47
It looks really nice, but I'm not a huge fan of that
7:51
So let's go ahead and put these buttons on. Let's not put any of my oils on there
8:03
Okay so one thing that we do need to do I notice is you need to poke that out The light shines through as you can see right there so now there a hole going through there And..
8:27
Okay, so we are done. Now the real question is, would I recommend that you guys get this
8:35
I probably would. It is a cheap, good alternative to having to replace the buttons
8:40
which is a big pain in the butt. But, I don't know
8:45
I'm not a huge fan of the fact that that one's already starting to kind of peel off because of the paint behind it came with it when I fixed it
8:52
But it does look nice. It looks a lot better. It isn't super noticeable that there's stickers other than that one button, I would say
8:59
This one's a little bit off center. but I'm a little bit afraid to move it. This one's a little bit off center, but I'm afraid to move it
9:05
So I probably would recommend you guys get this if you are running into the issue
9:10
because it does look much nicer, especially from afar. But once you get up really close, you can start to kind of notice the issues
9:18
And I'm not a huge fan, especially of this one right here. This one, like right here, worked really, really well
9:23
All three of these did. But this one right here just wasn't quite as nice
9:27
All right, so now that I've sat with it for a couple of minutes and kind of take, taking a look at it. I think I am going to go ahead and reach out to the seller to maybe see if I
9:35
can get a little bit of a replacement pack. I'll leave comments on that in the article that I'm
9:40
a link down in the description. The article review of this, I'll let you guys know the update on
9:45
that one, as well as I might create a short video at a later time. I'm just not a huge fan of
9:49
the fact that that sticker did peel off the paint behind it. It doesn't appear that it's going
9:52
to be a permanent fix and stay there just because so much of the adhesive behind that sticker
9:56
is gone. And I obviously don't have a replacement sticker for it. So I'm hoping maybe they
10:00
will replace that for me and send out a new sticker pack. I really hope that is the case
10:05
Obviously, it does look really nice. And it's not that big of a deal, but I would love these to last a little bit longer than what I think is probably going to be a couple days
10:12
But we will see on that. I do still recommend this pack. I think it's actually a really good way of doing it
10:17
Just you might, it's just you might run into where the paint peels off
10:21
So you want to make sure that you get it right the first time or maybe think about buying two packs instead of just one so that you have something ready to go if that does
10:30
happened to you. So I am going to go ahead and leave a link down in the description as well as the
10:34
top comment for you guys so that you can get these for yourself if you have a 2007 Chevy Tahoe
10:39
I do believe they have a ton of other ones as well. And I hope it works for you guys. I do recommend
10:44
it, but just be careful. I made some mistakes on my end, so don't make them for yourself
#Vehicle Parts & Services